Table of Contents
In this article, I will take you through 12 Easy Steps to Install NVM for Node.js on Ubuntu 20.04. Node Version Manager(NVM) is the most popular tool available for node.js version management. If you are Node.js developer or beginner then it is very important for you to have understanding about this tool. Using nvm tool you can easily install different versions of Node.js and even switch your version back and forth. This activity usually done to test the code with different version. Here I will not only explain the steps to install nvm for Node.js but will also explain how to switch your node version.
What is NVM ?
NVM is known as Node Version Manager. It is used for installing and managing different versions of Node.js in various Linux environments. Any Node.js developers working on multiple projects which requires different Node.js versions usually prefer this tool to install, uninstall and switch various node versions instead of manually installing and uninstalling each version required for each of the projects. One can easily build their app using this tool. Undoubtedly, this tool saves lots of time and effort.
Install NVM for Node.js on Ubuntu 20.04
Also Read: 5 Easy Steps to Install Openssh-Server on Ubuntu 20.04 to enable ssh
Step 1: Prerequisites
a) You need to have a running Ubuntu 20.04 Server.
b) You should have apt tool installed in your Server. To Know more about apt get tool, you can check 20 Useful apt get examples on Ubuntu.
c) You should have curl tool installed in your Server. To Know more about curl tool, you can check 20 Useful curl command in Linux with Examples | How to Use curl in Linux.
d) You should have sudo access to run Privileged Commands. Please Check How to Add User to Sudoers to know more about providing sudo access to the User.
Step 2: Update Your System
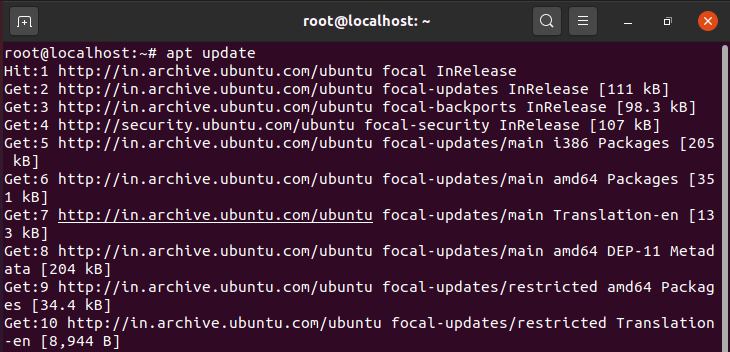
Before installing a new package in your system it is always recommended to update your system using apt update or apt-get update as shown below. This command will download and install all the latest available updates from Ubuntu Repository.
NOTE:
root user to run all the below commands. Since I have already logged in with root user so you won’t see me using sudo keyword with every command. You can however use this keyword if you are not logged in with root user or else you might see permission denied error.Step 3: Download and Install NVM for Node.js
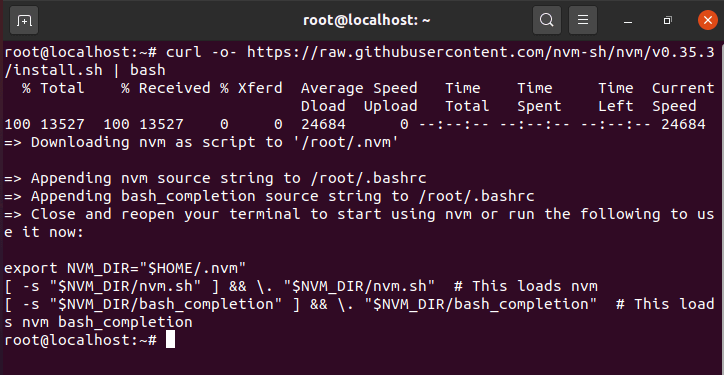
After updating your server you need to download and install nvm using curl -o- https://raw.githubusercontent.com/nvm-sh/nvm/v0.35.3/install.sh | bash command as shown below. You can visit GITHUB to know more about the latest installation script currently available.
Step 4: Check NVM Version
Once NVM is installed in your server, you can check its version by using nvm --version command as shown below. As you can see from below output current installed nvm version is 0.35.3.

Step 5: Install Node.js through NVM
After installing NVM you can now install Node.js using nvm install node command as shown below. This command will download and install the latest node.js version from its official Link.

Step 6: Check Node version
You can check the Node version using node --version command. As you can see from below output, current installed version is v14.10.0 which is the latest version available at the time of writing this article.

Step 7: Install Latest LTS Version using –lts
If you want to install the latest Node.js LTS version then you need to use nvm install --lts command as shown below. This command will search and install the Latest available LTS version for you. You don’t have to specify the version manually.

Step 8: Install Node.js version 11.5
If you want to install any specific Node.js version then you need to use below nvm install command. In this example, we are trying to install Node.js version 11.5 using nvm install 11.5 command.

Step 9: List All Installed Version
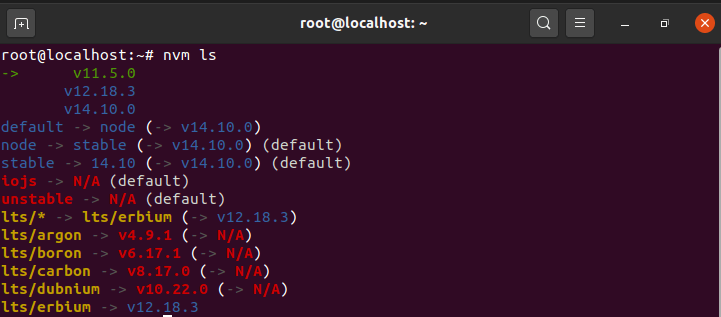
If you want to check all installed Node.js version then you need to use nvm ls command as shown below. As you can see from below output, currently there are 3 different node versions are available in the system.
Step 10: Switch Node.js version
If you want to switch your Node.js version then you need to use below nvm command. In this example, we are switching our Node.js version to v14.10.0 using nvm use v14.10.0 command.
![]()
Step 11: Uninstall Node version 11.5
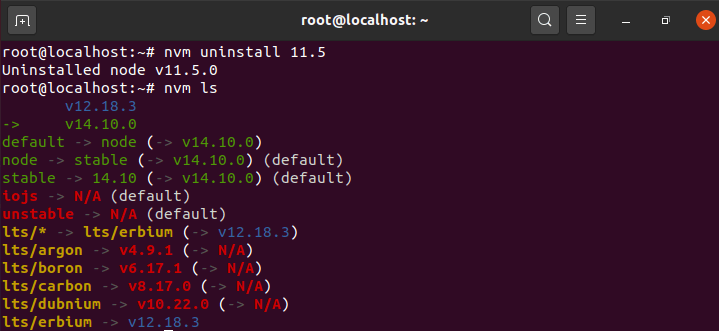
If you want to uninstall a specific Node.js version then you can use below nvm command. In this example, we are uninstalling version 11.5 using nvm uninstall 11.5 command as shown below. After successful uninstallation, if you run nvm ls command then you will not see version 11.5 in the list.
Step 12: Install Stable Node.js Version
If you want to install the stable node.js version then you need to use nvm install stable command as shown below. You might have noticed we are not specifying any particular version here so this command can be used if you don’t know the latest stable version.

Recommended Posts:-
10 Useful iproute2 tools examples to Manage Network Connections in Linux
6 Popular Methods to List All Running Services Under Systemd in Linux
Unix/Linux Find Files and Directories Owned By a Particular User(5 Useful Examples)
33 Practical Examples of ulimit command in Linux/Unix for Professionals
Install Node.js in 6 Easy Steps on Ubuntu 18.04
How to Install NVM for Node.js on Ubuntu 18.04
How to Limit CPU Limit of a Process Using CPULimit in Linux (RHEL/CentOS 7/8)
How to Install Rust Programming Language in Linux Using 6 Best Steps
Bash For Loop Examples to Check Processes using Swap Memory in Linux
